# checkra1nデバイスでtethered downgrade / jailbreakを行う
注意: これは単なるトリックです。まだ足りないものがあるかもしれませんし、近いバージョンでしか動かないかもしれません。
device: (Apple A7-A11)
req: なんらかのios 14.x (or less?) blob
# step1
restore ramdisk内のasr/restored_externalにパッチを適用します。
- iSuns9's restored_external64patcher
- exploit3dguy's asr64_patcher
# step2
カーネルにパッチを適用します。
- iSuns9's fork Kernel64Patcher
# step3
ipswに変更を加えます。
これは、odysseus(32)やiboot exploitを使ったダウングレードを知っている人たちにとってはよく知られた手法です。
ipswのFirmware/all_flash/配下に格納されているLLB/iBoot等をshshに対応したものに置き換えます。また、Restoreプロセスで使用するファームウェアとそれが競合する場合はBuildManifestを書き換えることで対応します。これに関しては詳しくはodysseusを参照してください。
これによって、デバイスは復元後にDFU modeではなくRecovery modeで起動するようになります。
# step4
CFWで復元します。
futurerestoreを用いて復元します。
- futurerestore
- 0x7ff's gaster
pwndfuモードに入った後、futurerestoreで復元します。
MBP:~ user$ ./gaster pwn
MBP:~ user$ ./futurerestore -t ticket.shsh2 --latest-baseband --latest-sep --use-pwndfu --no-cache --skip-blob --rdsk custom_ramdisk.im4p --rkrn patched_kernel.im4p custom.ipsw
復元後、デバイスはRecovery Modeになります。
# step5
checkra1nで起動します。
注意: 現状のcheckra1n v0.12.4はiOS 14以下のiBootを搭載したデバイスに対してのみ機能します。つまり、前提条件にあるように、iOS 14のshshがない場合はこの手法を使用できません。
checkra1nでデバイスをtethered bootしたいところですが、そのままではpongoOSは起動しません。checkra1nのbootchainは署名されたブートローダーにのみ有効で、tethered downgeadeしたデバイスに対しては機能しません。 しかし、現在ターゲットデバイスはiBootまでは署名されたブートチェーンを持っているため、stage2 KJC Loaderまでは起動可能です。 stage2以降のパッチに関してはすでにオープンソースになっているため、ここから確認することができます。
- checkra1n's pongoOS
現在の起動を妨げている要因は、主にカーネルやdevicetreeなどのファームウェアが有効な署名を持っていないためです。 したがって、pongoOSがiBootをパッチするタイミングにimg4の署名検証をスキップするパッチを追加するだけで、pongoOSを起動することが可能になります。
任意のpongoOSは、-kフラグをつけることで読み込み可能です。
MBP:~ user$ /Applications/checkra1n.app/Contents/MacOS/checkra1n -k path/to/pongo.bin
pongoOSが起動したら、通常通りにkpfを実行してデバイスを起動するだけでtethered downgradeしたデバイスをcheckra1nでjailbreakした状態で起動可能になります。
# demo
iOS 14.8のshshを使用して、iPhone 6s(n71ap)をiOS 14.3にtethered downgradeします。
これはiPhone 6s用のdemoです。他のデバイスでは何かが不足している可能性があります。
# 必要なもの
- libdmg-hfsplus
- img4lib
- ldid
- asr64_patcher
- restored_external64_patcher
- Kernel64Patcher
- kerneldiff.py
- gaster
- futurerestore
- pongoOS
- checkra1n
# 手順: CFWの作成
# ipswを展開します。
unzip iPhone_4.7_14.3_18C66_Restore.ipsw -d custom/
unzip iPhone_4.7_14.8_18H17_Restore.ipsw -d temp/
# DeviceTreeを移動します。
mkdir custom/Downgrade/
mv custom/Firmware/all_flash/DeviceTree.n71ap.im4p custom/Downgrade/
mv custom/Firmware/all_flash/DeviceTree.n71map.im4p custom/Downgrade/
# 14.3のFirmware/all_flash/を14.8のものに置き換えます。
rm -r custom/Firmware/all_flash/
mv temp/Firmware/all_flash/ custom/Firmware/
sudo rm -r temp/
# DeviceTreeを戻します。
rm custom/Firmware/all_flash/DeviceTree.n71ap.im4p
rm custom/Firmware/all_flash/DeviceTree.n71map.im4p
mv custom/Downgrade/DeviceTree.n71ap.im4p custom/Firmware/all_flash/
mv custom/Downgrade/DeviceTree.n71map.im4p custom/Firmware/all_flash/
rm -r custom/Downgrade/
# RestoreRamdisk内のファイルにパッチを適用します。
./img4 -i custom/038-83284-083.dmg -o rramdisk.dmg

### ASR
./hfsplus rramdisk.dmg extract usr/sbin/asr asr
ldid -e asr > asr.xml
./asr64_patcher asr asr_p
ldid -Sasr.xml asr_p
./hfsplus rramdisk.dmg mv usr/sbin/asr usr/sbin/asr_o
./hfsplus rramdisk.dmg add asr_p usr/sbin/asr
./hfsplus rramdisk.dmg chmod 0755 usr/sbin/asr
rm asr asr_p asr.xml

### restored_external
./hfsplus rramdisk.dmg extract usr/local/bin/restored_external restored_external
ldid -e restored_external > restored_external.xml
./restored_external64_patcher restored_external restored_external_p
ldid -Srestored_external.xml restored_external_p
./hfsplus rramdisk.dmg mv usr/local/bin/restored_external usr/local/bin/restored_external_o
./hfsplus rramdisk.dmg add restored_external_p usr/local/bin/restored_external
./hfsplus rramdisk.dmg chmod 0755 usr/local/bin/restored_external
rm restored_external restored_external_p restored_external.xml

./img4 -i rramdisk.dmg -o custom_ramdisk.im4p -A -T rdsk
rm rramdisk.dmg
# RestoreKernelCacheにパッチを適用します。
./img4 -i custom/kernelcache.release.n71 -o kc
./Kernel64Patcher kc pwnkc -a -f
touch kc.bpatch
python3 kerneldiff.py kc pwnkc
./img4 -i custom/kernelcache.release.n71 -o patched_kernel.im4p -T rkrn -P kc.bpatch
rm kc pwnkc kc.bpatch
# UPDATE: KernelCacheにパッチを適用します。
これは本来ならpongoOS上で実装すべきですが、今回は概念実証のため、KernelCacheに直接パッチを適用します。
これはAOPなどの未署名ファームウェアを使用するために必要となります。
mv custom/kernelcache.release.n71 custom/orig_kernelcache.release.n71
./img4 -i custom/orig_kernelcache.release.n71 -o kc
./Kernel64Patcher kc pwnkc -f
touch kc.bpatch
python3 kerneldiff.py kc pwnkc
./img4 -i custom/orig_kernelcache.release.n71 -o custom/kernelcache.release.n71 -T krnl -P kc.bpatch
rm kc pwnkc kc.bpatch
# zipします
cd custom/
zip -r0 ../custom.ipsw *
cd ..
# 手順: 復元
# futurerestoreを使用して、デバイスをcustom.ipswで復元します。
./gaster pwn
./futurerestore -t ticket.shsh2 --latest-baseband --latest-sep --use-pwndfu --no-cache --skip-blob --rdsk custom_ramdisk.im4p --rkrn patched_kernel.im4p custom.ipsw
# 手順: 起動
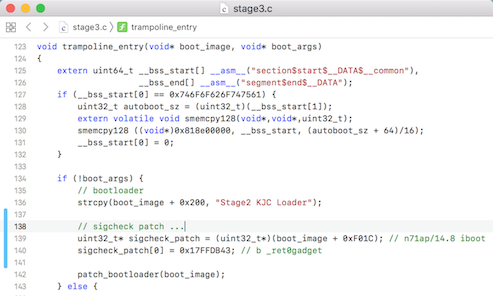
pongoOSがiBootをパッチする際に、追加で署名チェックを回避するパッチ適用させる必要があります。
私は現時点ではそれを簡単に行う方法を作成していない点に注意してください。
例えばiPhone 6s, iOS 14.8のiBootを対象とする場合、このようなパッチを追加するとimg4の署名チェックを回避することができます。

このpongoOSをcheckra1nを使用して起動します。 リカバリーモードのデバイスをUSB接続してこれを実行して、画面の指示に従ってください。
/Applications/checkra1n.app/Contents/MacOS/checkra1n -k pongo.bin
pongoOSが起動した後、ra1npocにあるpongotermを使用すると、checkra1n v0.12.4で使用されているkpf/rdskをデバイスに転送して起動させることができます。
./pongoterm -r